

I love that November has arrived! Although, you may hear me say that about any given month of the year! It is sad to me to see some accounts I follow on Social Media completely skip the joy of a month of gratitude (and delicious food) to zip straight to twinkly lights and candy canes. Don't get me wrong, I LOVE Christmas as much as the next caroler, but I also love the season of Thanksgiving and, I may have mentioned on the blog before, the way it prepares our hearts more deeply for celebrating the coming of our Lord.
That is why I take time each year to really focus on this last autumn festivity before diving full-on into tinsle and snow mode! If you caught the blog yesterday, you saw where I am transferring articles over from my old blog from a year where I took some time to really articulate the elements of the season. I wanted to post these recipes and tips here on F&H Pub (and update a bit) this year (it has been EIGHT whole years since these articles were last read!!) as part of a grater project I have going on behind the scenes.
Each Friday until Thanksgiving, I will be re-sharing a [updated] post from my old "Taste of Thanksgiving" series for a bit of inspo and encouragement! I welcome any additional tips you may want to share on each week's topic, as well as questions, in the comments section below or on social media!
With that intro out of the way, are we ready for a taste of Thanksgiving [h]appetizers from the Jones Family household?
Friday, November 6, 2015

...Today we wrap up our week with some fun tid-bits. Remember when I told you earlier this week I actually love tradition? I was also explaining how we simply need to be careful we are not worshiping tradition and we leave room for change (when necessary) and put God's plans first and foremost in all things. I will have to remember to share with you about the Thanksgiving we had Deer Meat Stew instead of Roast Turkey! We had a lot of changes that year in order to keep God's plan and leading for our lives first.
Each week I share A Taste of Thanksgiving this month I want to post one or two tried and true recipes we enjoy each season as well as a craft idea for the family to enjoy.
This week's recipes: appetizers...
Pine cone Cheese'ball'
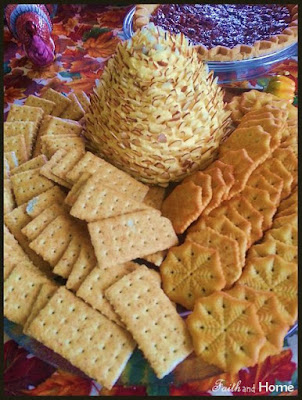
Everyone in our family LOVES this delicious treat... mostly for its appearance! Hubby and I will feast on the nutty exterior for days after Thanksgiving. It looks complicated, but it is super easy. The only hitch is how time consuming it can be. I usually pop in a good movie and take my time.
For a crowd-pleaser sized 'ball' you need:
2 packages (8oz ea.) cream cheese, softened to room temp.
4 cups shredded cheddar or Monterrey Jack Cheese
3-4 Tbsp Dijon or regular mustard
1/2 - 1 cup sliced almonds
waked paper
( You can easily halve this recipe for a more intimate gathering)
In a mixer (I use my kneading blades) mix cream cheese, shredded cheese, and mustard until combined. I place an approximate 6x6 square of wax paper on a dessert plate and, using my hands to form a ball with the cheese mixture in the bowl, I set the ball on the wax paper covered plate and begin to form a pine cone shape. Once I have it how I like it, refrigerate for a few hours or overnight. Slightly firm is most helpful in the next step.
This is where I put in a good movie and kick back... this part is tedious! But don't worry, you will finish before your movie! Starting from the top of your cheesy pine cone, begin inserting sliced almonds into the 'ball', wide end first and at an angle so the tip of the almond is pointing up(ish). Don't worry about making a straight line, think actual pine cone which has an alternating pattern. Continue until you reach the bottom and then stick back in fridge until ready to serve. (If you start from the bottom you will break pieces of almonds off as you try inserting slices above. Top-down gives the best form and least breakage)
Why the wax paper? Well, when you are ready to serve, simply slide the pine cone off the plate by the wax paper and place on your serving platter. You can either remove the wax paper all together or trim it so it is unseen. Serve with crackers and summer sausage and I guarantee it will be a crowd pleaser! Be sure to have a small butter knife for slicing into this 'ball' it isn't super soft and you will have cracker crumbs everywhere if you are trying to use a cracker to slice some off! It also helps to set it out from the fridge for about 30 minutes before serving. You can even garnish with sprigs of rosemary for a real pine look!
P.S. this is versatile: I made it one year for a Christmas Eve get-together and made an actual ball, rolled it in the almonds and cut a little cheddar cheese topper like an ornament, stuck the crook of a pretzel in the cheese to look like a hook and we had a tasty ornament on the cracker tray!!!
Cornucopia Bread

I saw this idea in a magazine once and have managed to perfect the style with my own flare. I use to make a LARGE one, the size of your average cornucopia. However, there were many structural headaches which often required toothpicks and cover-ups to conceal on my Thanksgiving hors d'oeuvres table! The last few years I have tried smaller versions with much greater success and, through trial and error, I even pulled it off with no tearing last year! This one always gets eaten after Thanksgiving, we all enjoy how pretty it is on the table but once the show is over... it is gobbled as quickly as the Thanksgiving turkey!
What you need:
Bread dough recipe of choice (you can also use pre-made bread dough or bread stick dough from your local grocery cooler)
Egg white + 1 Tbsp water
Aluminium foil (NOT dollar store foil) preferably heavy duty but regular will work
Oil or lard
Baking sheet
Basting brush (and dish)
Start by forming a cornucopia shape with the foil. I will tear a peace and make it a ball, then tear more and make 'ropes' to form around the ball. Last year I figured out to do one final cover with a solid sheet of foil over the ball and rope form so my bread doesn't rise into the cracks of the coils (making it nearly impossible to remove after baking).

You can see it isn't super big, maybe slightly longer than my hand. Once your shape is formed, grease it and your baking sheet with oil or lard. You CAN use cooking spray on your baking sheet, but I recommend actual oil or lard on your form for easier removal once baked.
Take bread dough and make ropes. Working over your baking sheet (so you can set the cornucopia down as you work) begin wrapping your foil form with the ropes, try not to press the dough too hard onto the form (it will rise and get stuck in the cracks). Instead, try to press the dough into itself by placing each rope snugly against the next as you wrap. Don't worry if you have multiple ropes, simply press the ends together well and attempt to have them meet on the underside and no one will ever know!
Baste your finished cornucopia with egg white and water mixture.
You CAN let this rise but I often just start it baking right away. I don't have an exact time, I sort of wing this based on other roll recipes. Approximately 350 degrees for 10-20 minutes. Keep an eye on it the first time you do this and make a note of how long it took for next time!
You may have noticed muffin tins in the background of that last shot... I use the same dough and make bread rolls for dinner at the same time I work on the cornucopia.... two birds, one stone? Pun intended!

Serve on dish with mixed raw veggies and dip of choice.
Speaking of dip.... my family threatens revolt if I don't make my special dip for EVERY.single.holiday and occasion demanding it:
Amanda's French Onion Dip:
What you need:
1 pkg (8oz) cream cheese softened to room temp (on budget tight years, I omit the cream cheese)
1 container (16 oz) sour cream
1 pkg onion soup mix*
Plop all ingredients in mixer and blend! Viola!
Is that easy or what? If you like extra oniony taste, add diced green onions. *I use a homemade onion soup mix and season to taste. If it has dried onions in it, make this dip ahead of time and refrigerate all day or over night otherwise the onion flakes will still be crunchy when serving and not as appetizing (resting in the fridge a while softens the onion flakes). Need to make this in a pinch? Use a wire sifter and sift the soup mix into your wet ingredients and save the dried onion flakes for another dish. Your dip will be ready the second you turn your mixer off!
*******
This week's craft is one you can keep going all month long....
Thankful Leaves
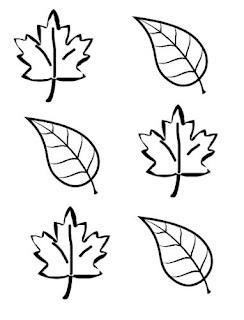
We have made this in variations over the years but always using construction paper cut outs I did myself. You can print and cut out and color the leaves above if you prefer (link in image) or use them as tracers. Leaf shaped cookie cutters work well as tracers also.
Some variations on HOW we have done Thankful leaves:
- Everyone gets a color or style and writes one "Thankful for..." each day.
- We have a family night the week before Thanksgiving and everyone writes their top 3 or 5 "Thankful for...." from the year.
- To break the chain of plain-old thankfuls (I'm thankful for my sister or dinner or the blue sky), we began using gratitude scripture readings a few times a week and then based our "grateful" on a response to the scripture
- One year we even did turkeys and wrote thankfuls on construction paper 'feathers', traced our hands for the body and stuck the feathers on... this is an awesome keepsake when the kids are young!

Variations on display:
- Turkey, as mentioned above, which we hung on our kitchen door
- Cut out a leafless tree from construction paper, taped to kitchen door, taped leaves around as they accumulated
- hung leaves on a twine line in our dining room as they accumulated
- hung leaves from chandelier and ceiling
- had large clay pot with florist foam in the bottom, stuck sticks/branches we gathered in the foam and covered the foam with moss. Hung thankful leaves from the branches using hole punch and twine
- hung leaves on window.... which didn't work well because condensation from the changing weather and cooking inside made the paper wet and ultimately ruined our leaves!!!!!
Our family has always placed high value on heartfelt gratitude all year, but particularly during the season of Thanksgiving, especially in an era when so many kids are tempted to think of themselves or their wants above others (even more-so pre-Christmas season). No matter how old our kids get, we never seem to grow tired of doing gratitude activities. All of us, including my husband (!!!), look forward to this activity every year and welcome the variations as a mix-up on our fun tradition. I like to challenge them, too... when their gratitude prompts seem less thoughtful (moms, you know when your kids aren't trying very hard!!) I might encourage some deeper consideration but suggesting things like:
- I'm glad you are grateful for your sister. What makes you feel that way towards her?
- You are thankful for the grilled cheese you had for lunch? How come?
- No idea what to write? Well, in what ways and why do you feel grateful for God?
- Is there anything hard God helped you manage recently that you can thank Him for?
... I'm sure you get the idea! You can even go month-by-month if your family's memory is sharp enough! With pre-k kids, be their scribe! They will love this activity too. One year we even played a "Guess what the baby is grateful for" game and we each wrote something applicable on our baby's behalf! (That one was probably the funniest year!)
Whether cooking or crafting, the most wonderful part of the season is memory making. Relish the moments, record your memories (our Thanksgiving planner has a page for that!!), because it really does go by fast and the season of giving thanks is such a wonderful time to really soak up the richness of gratitude and family!
Be sure to come back Monday for the weekly Heart and Home challenge as we prepare for Turkey time!
Wednesday we will explore Chapter 1 of Philippians and how we CHOOSE Gratitude!
Next Friday... well, come back and see! We will have another installment of A Taste of Thanksgiving with more yummy recipes and another new craft!
I'm grateful you are here!
Blessings,

Grab your FREE Thanksgiving planner here:

And visit yesterday's post, "Preparing Heart and Home: Week 1" for some tips on using the planner.
also
Looking for a gratitude study for the month of November? Grab your FREE download here:
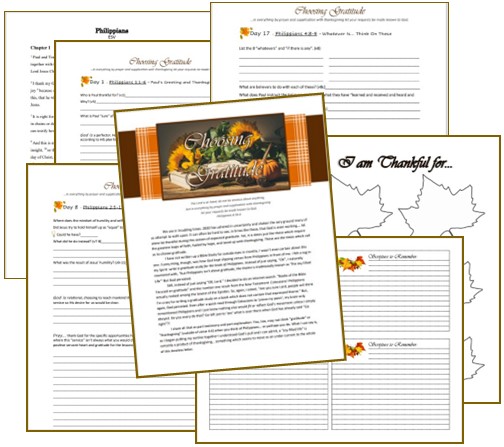
This study is great for private Bible time OR it works just as well for the whole family. It can even become a part of your November homeschool curriculum!